There are many ways to use the FlexxiCore Challenger - depending on your fitness level, age and objectives.
First of all you can watch a training video here which gives tips on how to start using the FlexxiCore Challenger.
Set out below are a variety of workout routines that can be used with the Flexxicore Challenger which combines vertical vibrations with see-saw like oscillations from side to side. You may customise your workouts according to your needs, whether you start as a novice or have the experience to use more advanced techniques a professional user. The guidelines below will help you get started quickly so you can feel some benefits straight away.
The vertical vibrations create a resistance type workout and the oscillating movement imparts a more intense workout for stimulation and circulation. This combination of vibrations and oscillations will give an accelerated and more intense result from workout routines of your own design and choice. Each session will typically last 10 minutes, and you can include a variety of elements in that time. For example, this 10-minute workout which was published in Personal Trainer Magazine has 8 sections, including warm-up and cool-down. As you engage with the FlexxiCore Challenger’s effects and observe how your body responds you may naturally feel the urge to modify your practice. We encourage you to “listen to your body” and not to treat these or any other guidelines as a fixed formula.
Firstly, some important common sense guidelines for all users:
- As with all electrical appliances, safety is advised. Please study the User Manual and always make sure that the electrical cord does not hinder the user.
- Wearing loose clothing is advised for better range of movements during exercises.
- Do not exercise straight after eating or with a full stomach.
- Do not exercise in a dehydrated state.
- Please be aware that your medical condition could compromise use of the Challenger; check the User Manual for Contraindications and, in case of doubt, check with your doctor or other medical practitioner.
- Always start with the lowest vibration/speed setting.
Before going any further, we recommend that you read our Supplement to the basic User Guide which gives lots of tips on getting the best from your Challenger.
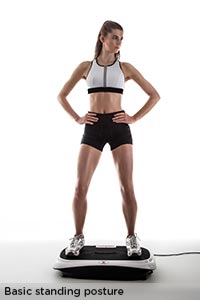
Basic Standing Posture (see picture)
Stand on the machine with feet slightly apart to begin stimulation of overall body and to elevate the body's balance mechanisms. As you widen your feet further apart, you allow more vibration to travel up through the body and increase the intensity. You will also notice that if you bend your knees a little, the leg muscles get more of a workout, while if you keep your knees straight the vibrational force travels up through the core of the body with more intensity. Please therefore adjust your feet and knees, and also adjust the manual mode settings, to suit your individual requirements. You can gradually experiment with these variations to exercise and stimulate different parts of the body.
A variation of the standing posture, for those who are comfortable to do it, is to have the leg bent behind with the foot reaching up to the buttocks. This helps to stretch the quadriceps and knee joint ligaments. It activates the gluteus muscles of the buttocks. Standing on one leg generates an extra response from the body's natural balancing capacity, increasing the impact of the core workout. The hands can be in different positions, not only on the hips as in the picture on this page.
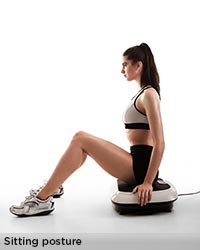
The Sitting Posture (see picture)
The sitting posture offers a gentle massage for the whole body. If required you can also massage specific areas, for example, the back of the thighs or the calves while sitting next to the machine. Or you can sit on the machine to massage the buttocks and at the same time allow the vibrational force to stimulate your core muscles.
During these exercises blood flow to the skin is enhanced, so you might notice some redness, which is perfectly normal.
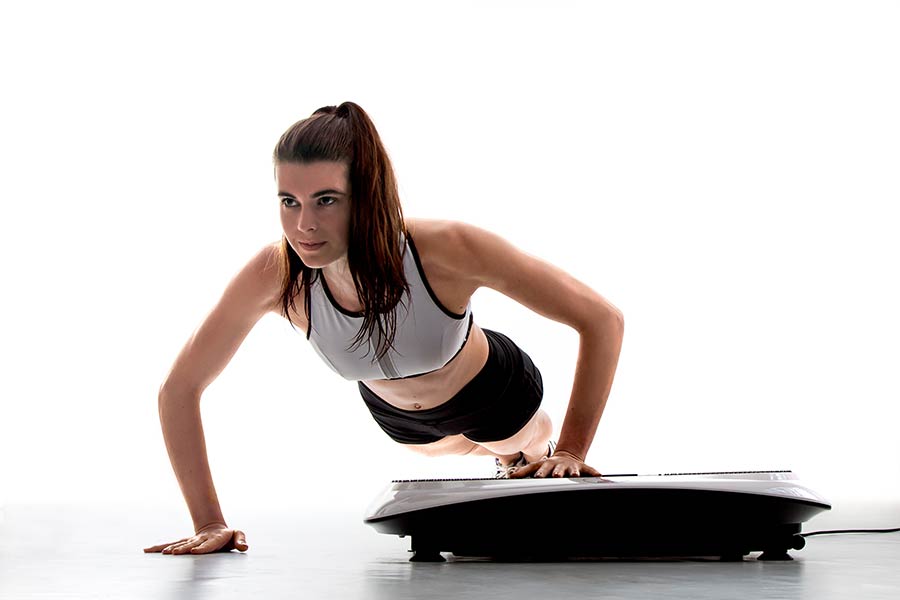
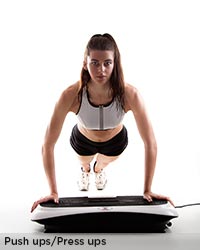
Push ups/press ups (see picture)
Place your hands on the machine, shoulder-width apart and elbows slightly bent. The reason for bending the elbows is to allow more muscle flexion in the arms, and consequently for more vibrations to travel through them. This increases the intensity of the workout. Please note that the greater the flexion, the harder the exercise becomes.
Although in this position all the major muscle groups in the upper and middle part of the body are activated, it is mainly for the chest, i.e. the pectoralis major. Other areas of muscle activation are the rectus abdominus, obliques, trapezius, latissimus dorsi, gluteus maximus, triceps, biceps and deltoids. The number of repetitions (“reps”) to use can be gauged by simply sensing how much “burn” is felt in the corresponding muscles. This way you can set your own targets. A more advanced method involves pulsing at the bottom of the push up. Once again the number of reps can be set according to your level.
Alternatively the hands are placed on both outside edges of the machine for a harder workout. In all cases going slower or faster on the push up/press up varies the intensity of the work out. In this case it is important to make sure that there are no oily substances on the palms of the hands, because the edge of the machine is a very smooth surface.
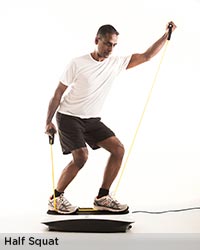
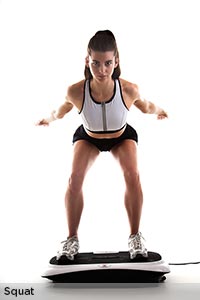
Squats (lower body) (see pictures - Half squat and Full squat)
In the squat postures shown in the pictures (one with use of resistance cords), the quadriceps group of muscles are activated. Arm positions during squats can be varied randomly and according to choice with or without a resistance band or cord for added intensity. However, having the arms in an upright position makes the workout far more intensive for the cardiovascular system, as blood needs to be pumped up to the arms against gravity.
Widening the legs further apart and making sure body weight is roughly 80% on the heels will allow for more direct travel of vibrational energy which could otherwise be lost in the arch of the feet and lessen the impact of the workout, i.e. there will be less G-force to respond to. An advanced variation of this technique is to pulse* when at the lowest point in the downward position. (*To "pulse" is to make small repeat movements of the same larger movement.)
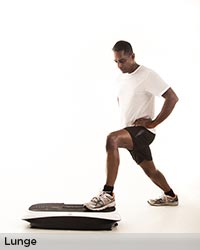
Lunge (see picture)
This is primarily a gluteus and hamstring exercise, and can be done with one leg placed on the machine with the travelling leg moving slowly behind as the chest is brought down towards the stationary leg which is on the machine, and is taking the full force of the vibrations. It is important to keep the knee bent about 15 degree.
When correctly applied by bending forward at hip joint, this will engage the gluteus and hamstring. The gluteus being a smaller muscle group, it will tend to experience fatigue faster than say the quadriceps. If a static lunge is employed then all the corresponding lower leg muscles and tendons will be engaged and worked according to the vibration intensity.
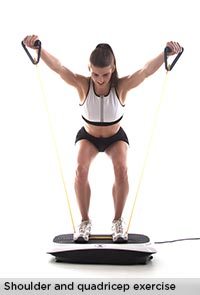
Shoulder exercise and shoulder exercise with quadricep exercise (see picture)
The muscle activation here is the deltoid and the quadriceps (if moving into a sitting position). The resistance band or strap is chosen to suit the user’s strength. (These bands & straps can be purchased in different resistance strengths - usually colour coded.) The arm positioning is by choice depending on variation of exercise.
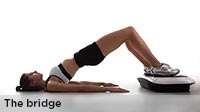
Bridge pose for activation of the lower back muscles (see picture)
Often called the Bridge Pose, this involves having your feet on the platform (as in the "Core workout" described below) and the shoulders and neck supported on the floor as required. Raise the body away from the floor to create the "bridge" effect, but only as far as is comfortable to avoid muscle strain. Over stretching the pectoralis muscles will hinder normal breathing patterns. It helps to push down on the arms for a stronger and steady support of the body.
The major dorsal, gluteus, and pelvic muscles are all activated during this bridge pose. By simply tightening these muscles through motor coordination, you can help work them harder because of the added resistance through the muscle tensing.You can add further intensity to the workout by raising the back up and down, and pulsing at various elevations of your choice.
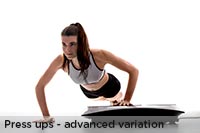
Push ups/press ups - advanced variation (see picture)
As you progress you naturally want to try out different poses. As the body gains strength, flexibility and better circulation, it becomes possible to add to your regimen of variations. The key to this is to steadily improve and gain confidence with the use of the machine. This will help you discover more fun as you increase your ability to maintain fitness for life with the Flexxcore Challenger.
Core workout
Lie down on a yoga mat or comfortable rug to keep the back comfortable and warm. Place a rolled up towel or suitable soft and firm foam support under the neck. Place both feet on the platform. This is a very relaxing posture as the spine lays flat and only the feet are on the machine surface, providing a soothing massage through the limbs. However it is in effect a core workout routine, where the muscle activation is for the external obliques - i.e the abs.
The machine is largely sending vibrations through the body, providing more of a massage to the calves and thighs. However, the vibrations still provide some beneficial stimulation to generate muscle response from the body, and an overall workout happens due to the acceleration effect.
When in this position you can alternate into the yoga bridge pose to activate the back muscles as well.
Resting in between poses helps recovery time during your exercise session.
Simple bicep exercise using resistance band or cord to activate the bicep brachii muscles
Before beginning this posture, it is important to make sure the strength and length of the resistance band or resistance cord selected is suitable for your needs. When in the standing pose the band should be able to reach waist height and then extend further during the exercise when the biceps contract. It is advisable to avoid flexing the wrists as this is a bicep exercise only. Variations in intensity can be achieved by changing the centre of gravity moving the hands away from the waist outwards.
Repeat as many times as in your choose whilst engaging full body vibration with knees in a soft position, slightly bent. The reps can be performed slowly or fast to vary the degree of calorie burn in the muscles.
Some more advanced variations
The standing pose with the leg bent behind
Once you are familiar with the basic standing pose, you can now practice a more advanced version of this pose by standing on one leg, which will serve to strengthen the core muscles and activate the body's natural self-balancing capacity further. This pose helps to stretch the quadriceps and knee joint ligaments. It activates the gluteus muscles of the buttocks.
If standing on one leg is at first challenging for you, it is helpful to set up the Challenger next to a wall, chair or support bar to steady yourself during the exercise. You can alternate with the opposite leg at regular intervals.
It is important to continually be aware of muscle fatigue so as not to overwork muscle groups and tire too easily - as this is an advanced workout at high speed. Please therefore start on lower settings and shorter time duration for maximum benefits.
Forward bend at full stretch (hands and feet on the platform) with knees slightly bent
This more advanced pose requires a full forward bend from the waist, with knees just slightly bent, and hands reaching down to the platform. If you are unable to achieve a full bend at first it is advised to warm up by first doing the stretch off the Challenger. This will guide you in exploring how far you can go safely without over stretching. You will find after just doing the basic standing pose on the Challenger for some time that the muscles will feel a lot more relaxed - which will help in doing this and many of the other poses that you may want to incorporate into your training program.
Note: only attempt to carry out this advanced pose when you are able to freely touch your toes in this forward bend from the waist. As the blood does tend to rush into the head in this pose, it is advisable to pay attention to this. If you start to feel either light-headed or faint, just go back to the standing pose and allow yourself to recover. As the circulation improves over time, the effect of blood rush will become less noticeable. (Blood circulation is also helped if you are well hydrated before this or any exercise program – so do have a glass of water before you start.)
The vibrations are stronger on the hands and arms when the hands are placed on the side of the Challenger so to start off gradually, work your hands from the front around to the sides.
The hands are gripping the sides of the machine for a more advanced workout. The core muscles are activated and the gluteus, hamstring and back muscles are all being stretched. It is important to realise that at high vibrations the body has to work harder to balance itself in this position. Start slowly and gauge your balancing ability.
Variations of the tricep muscles exercises
Once a good level of fitness is achieved in terms of flexibility you can vary your postures on the machine and use it to maximum advantage for physical fitness, utilising many more muscle groups. For example, you can start with both feet on the floor facing away from the Challenger, and placing your hands behind you on the edge of the platform (palms on the horizontal surface, fingers clasping the rounded surface on the front edge).
These muscles can be made to work harder by gradually placing the feet further away from the body. As you dip in and out you can pulse in the down position for a more intense workout of the triceps. Then try lifting one leg vertically with the foot above your head.
These advanced tricep exercise routines are all done while keeping the wrists strong to stop hyper-flexion. By keeping the feet close to the machine at first and then moving them away gradually you will notice the increase in resistance. As the exercise gets harder and more muscle groups engage (as a reverse plank type posture is achieved), a lot more stress is put on the wrists andelbows. Itis important to keep the elbows soft and the wrists strong. Once again, moving the hands out wider will be create the maximum oscillation and vibration, so it is advisable to gauge what suits your body. You can also dip up and down, and pulse at various degrees; all these variations will add to the intensity of the overall workout.
Advanced techniques using resistance bands
A variety of exercises can be done with varying resistance band strengths, incorporating pulsing moves at various elevations of the raised leg; the bent knee which is on the ground can be placed on a cushion if the floor is a hard surface. The elbow of the arm on the machine should have a slight bend for maximum vibration travel in the muscle fibers. This elbow can also be supported with a soft cushion to avoid making it too sore from resting on the mat of the Challenger's platform. The number of reps for each arm and leg is repeated to a comfortable extent - and not such as to over fatigue the muscles.
The resistance band can be used with both and leg movements which will serve to mainly activate the gluteus, biceps and triceps. It is important to clasp the fingers tightly and hold the wrist in position so as not to injure the wrist through excessive flexion. Always build up from a lower to a higher level resistance band to ensure a gradual improvement takes place in the muscle toning process.